

Our first task is to trim off the excess batting and backing around the quilt top. Use a rotary cutter and long ruler, as I'm doing here in this photo, or trim down the quilt the old fashioned way with a pair of scissors.

Once you've trimmed the quilt on all four sides, it should look like this:

Cutting and Joining the Binding Strips
Time to make our binding (yardage is listed in the first post of this series).
You have two options when it comes to cutting binding strips. The first option is to cut your binding strips along the width of the fabric (WOF). This is very simple and fast and is the method I typically use. The second method is to cut your binding along the bias. I opted to cut my binding on the bias because I love the way it looks with the stripey scarf print from the Sherbet Pips collection. If you're interested in this method, here's a link to my continuous bias tutorial. If not, read on.
For the WOF strip method, the first thing you need to do is determine the number of strips to cut. Our trimmed quilt is 40" square. 40" x 4 sides = 160" plus we need extra length for seam allowance and for making our mitered corners. Measure the width of your binding fabric, not including the selvedges. If it's less than 43", you'll need to cut 5 WOF strips (or 4 and 1/2). If it's more than 43" wide you can get away with only 4 strips.
To make WOF binding, use your rotary blade a long ruler to cut four or five WOF x 2.5" strips. I personally prefer to cut my binding strips to 2.25", but if you've never bound a quilt before I suggest you use the wider measurement.
Cut the selvedges off of both ends of all of the binding strips.
Place one strip right side up in a horizontal position.
 |
| This is some espresso brown binding I've already cut for another quilt. I won't be using this on my Four's a Charm quilt! |
Place another strip face down (right sides facing) in the vertical position so that the corners match up.
Use your ruler and a pencil to mark a diagonal line from the bottom left to the top right of the overlapping fabric.

Place a pin on each side of the mark, leaving enough room to sew your seam.

Sew along the marked line.

Repeat these steps until all the binding strips are joined together.
Use your ruler and rotary cutter to trim away all but 1/4" from each seam.

Press the seams open.

Finally, press the binding in half lengthwise, wrong sides facing.

Attaching the Binding
Now it's time to attach the binding to the quilt. Thread your machine with thread that matches the binding or something neutral. I'm using the same gray I used to do the free motion quilting. Attach your 1/4" piecing foot if you have one, otherwise, use the 1/4" measurement on your foot plate as your guide.
Tip: I simply love my "O" foot for my Janome. It's a 1/4" piecing foot and it has little markings at 1/4" before and after the needle. These markings are extremely helpful when sewing on binding as you'll see shortly. Don't have the same markings on your foot? You might want to consider marking these measurements with a Sharpie marker, or simply keep a ruler handy.
Starting at approximately the center of the bottom edge of the quilt, line up the raw edges of the binding against the right side of the quilt. Leave a tail of about 6-8" then start sewing on the binding using a 1/4" seam allowance. Reinforce your stitches when you start so they don't rip out as you're maneuvering around the quilt.
 |
| Leave a tail |
 |
| Sewing on the binding |
I use my right hand to guide the binding strip and my left hand to hold it all in place (gently!) so I don't have to pin anything.

Mitering the Corners
Stop sewing when you you're 1/4" from the edge of the quilt top edge. This is where I used the marking on my foot for a reference. I place a left fingertip on the spot where the quilt top ends underneath the binding and as soon as my thumbnail lines up with marking I stop sewing.
 |
| Stop sewing 1/4" from the edge of the quilt |
Backstitch to reinforce the seam then cut the threads.
Fold the binding up away from the quilt. The right edge of the binding should line up exactly with the right edge of the quilt.

Fold the binding back down so that the folded edge lines up perfectly with the top edge of the quilt.

Bring the folded end under the needle of your machine. Start sewing again 1/4" away from the top edge. Reinforce the seam.


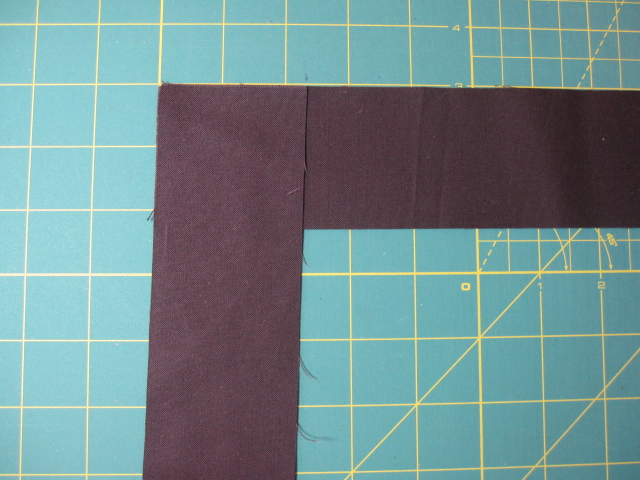
For reference, your corners should look like this when you're done:
 |
| right side |
 |
| left side |

center view
Continue sewing the binding on and repeat the miter method on the other three corners.
Stop sewing about 8-10" away from the spot where you started sewing the binding down to the quilt. Reinforce your stitches then cut the threads. Leave a nice long tail of about 8-10" of binding.
Joining the Binding
The instructions below are what I consider to be the easiest way to join the binding ends. It's not the best, though, because it leaves a bumpy spot at the seam. It's best to join the ends on the diagonal like you did the other strips. There's a link to a YouTube video on this method at the end of this tutorial so don't feel obligated to use my method.

Somewhere near the middle of the open space between the two binding ends, butt the binding strips up against each other so that one end is flat and the other end is folded over.

Measure 1/4" from the fold.

Make a straight cut across at 1/4" from the fold (or slightly more, like 3/8"). You might expect to cut it 1/2" from the cut, leaving you with 1/4" seam allowance at both ends, but I find that the binding stretches out a bit as you sew this bit down, leaving you with some bunching at the end of the open section. Making the binding length a little shorter than the opening on the quilt remedies this problem.

Open up the pressed binding on each end. Line them up, right sides facing, and pin.

Sew a 1/4" seam across. You'll have to bend and maneuver the quilt a bit to get the binding under the sewing machine's needle.

Finger press the seam open.

With the seam open, fold the binding back in half. Line it up with the edge of the quilt. Sew the remaining stretch down using a 1/4" seam. Remember to reinforce the stitches at each end.

Check it out!

This is a good stopping point. In the last post of the series I'll cover hand sewing the binding to the back of the quilt.
Here's the Youtube video I promised earlier. I really like this method and plan to use it on my next quilt:
Thanks for sewing along with me. I'd love to hear your comments/questions if you have any.
-Annik


