I'm excited to introduce my new quilt pattern, Bella Roma!
Here's a bit of info about the pattern...
The design was inspired by Italian tile work.
It's the perfect pattern for that single charm pack or layer cake hanging around in your fabric stash.
Most of the yardage required is solid quilting cotton. Since solids tend to be less expensive than prints it's economical. Hooray!
The pattern includes two versions:
a throw quilt made from one charm pack, a coordinating print for the floating squares and narrow border, and a solid background fabric. The finished size is 46" by 55 1/2".
a queen size quilt made from one layer cake, a coordinating fabric for the floating squares, and a solid background fabric. The finished size is 81" by 102".
The layer cake queen is great for medium and large-scale prints.
Big blocks!
If you can sew half square triangle blocks and strip piece sets, you can make this quilt.
The negative space in both versions create a perfect canvas for interesting free-motion quilting.
Use bold colors or muted tones. It's all good.
Does your scrap bin runneth over? Skip the pre-cuts and cut your own forty 5" squares or forty 10" squares.
Bella Roma comes in both a PDF instant download file, available on Craftsy and Etsy, and a paper version (Etsy shop only).
The pattern is $9. It includes 7 pages of detailed cutting and sewing instructions, loads of diagrams, and helpful tips.
And I have one more exciting bit of news.
Bella Roma is being offered as a class at Treadle Yard Goods in Saint Paul, Minnesota. The class starts this Saturday, July 20th at 2 p.m. LaVaughn Bye, seamstress and quilter extraordinaire, is teaching the course. Give Treadle a call at 651.698.9690to sign up. The pattern is available for purchase there, too.
Here's a photo of LaVaughn's Bella Roma. Isn't it lovely?
We have a winner!! Congratulations to Laura who left the 88th comment.
A huge thanks to all of you for participating in my Sew Mama Sew giveaway - and extra love to those of you who became new blog followers or Etsy shop hearters ;)
I'll be posting the results of the favorite new fabric lines later today so check back soon for the must have fabrics of 2012!
**********
I returned home from International Quilt Market yesterday only to learn that today is Sew Mama Sew Giveaway Day (week, really). I was planning to do a giveaway of market goodies anyway so talk about serendipity!
A Kona Charm Square pack, four 2 1/2" square bundles of new Moda fabrics, a signed copy of Transparency Quilts by Weeks Ringle and Bill Kerr, a copy of "Mary Janes Farm" magazine, Melody Miller temporary tattoos, and a cool button from Liesl & Co.
To win this bundle of quilty goodness scored in Kansas City, please leave a comment with the answer to the following question:
Which new or coming soon fabric line do you absolutely have to have in your stash?
This giveaway is open to anyone. Please leave your entry before 5 p.m. PST on May 25th.
I will announce the winner in this post on the night of May 25th. I will also contact the winner via e-mail, so please leave your e-mail address in your comment if you're a "no reply" blogger.
Finally, while it's definitely not required, I would be delighted if you decided to follow any or all of the following -
Woohoo! We're almost done with our Four's a Charm baby quilt! In this installment we're going to cover making binding and sewing it on to the quilt. Hand sewing the binding will be the last installment (coming soon).
Our first task is to trim off the excess batting and backing around the quilt top. Use a rotary cutter and long ruler, as I'm doing here in this photo, or trim down the quilt the old fashioned way with a pair of scissors.
Once you've trimmed the quilt on all four sides, it should look like this:
Cutting and Joining the Binding Strips
Time to make our binding (yardage is listed in the first post of this series).
You have two options when it comes to cutting binding strips. The first option is to cut your binding strips along the width of the fabric (WOF). This is very simple and fast and is the method I typically use. The second method is to cut your binding along the bias. I opted to cut my binding on the bias because I love the way it looks with the stripey scarf print from the Sherbet Pips collection. If you're interested in this method, here's a link to my continuous bias tutorial. If not, read on.
For the WOF strip method, the first thing you need to do is determine the number of strips to cut. Our trimmed quilt is 40" square. 40" x 4 sides = 160" plus we need extra length for seam allowance and for making our mitered corners. Measure the width of your binding fabric, not including the selvedges. If it's less than 43", you'll need to cut 5 WOF strips (or 4 and 1/2). If it's more than 43" wide you can get away with only 4 strips.
To make WOF binding, use your rotary blade a long ruler to cut four or five WOF x 2.5" strips. I personally prefer to cut my binding strips to 2.25", but if you've never bound a quilt before I suggest you use the wider measurement.
Cut the selvedges off of both ends of all of the binding strips.
Place one strip right side up in a horizontal position.
This is some espresso brown binding I've already cut for another quilt. I won't be using this on my Four's a Charm quilt!
Place another strip face down (right sides facing) in the vertical position so that the corners match up.
Use your ruler and a pencil to mark a diagonal line from the bottom left to the top right of the overlapping fabric.
Place a pin on each side of the mark, leaving enough room to sew your seam.
Sew along the marked line.
Repeat these steps until all the binding strips are joined together.
Use your ruler and rotary cutter to trim away all but 1/4" from each seam.
Press the seams open.
Finally, press the binding in half lengthwise, wrong sides facing.
Attaching the Binding
Now it's time to attach the binding to the quilt. Thread your machine with thread that matches the binding or something neutral. I'm using the same gray I used to do the free motion quilting. Attach your 1/4" piecing foot if you have one, otherwise, use the 1/4" measurement on your foot plate as your guide.
Tip: I simply love my "O" foot for my Janome. It's a 1/4" piecing foot and it has little markings at 1/4" before and after the needle. These markings are extremely helpful when sewing on binding as you'll see shortly. Don't have the same markings on your foot? You might want to consider marking these measurements with a Sharpie marker, or simply keep a ruler handy.
Starting at approximately the center of the bottom edge of the quilt, line up the raw edges of the binding against the right side of the quilt. Leave a tail of about 6-8" then start sewing on the binding using a 1/4" seam allowance. Reinforce your stitches when you start so they don't rip out as you're maneuvering around the quilt.
Leave a tail
Sewing on the binding
I use my right hand to guide the binding strip and my left hand to hold it all in place (gently!) so I don't have to pin anything.
Mitering the Corners
Stop sewing when you you're 1/4" from the edge of the quilt top edge. This is where I used the marking on my foot for a reference. I place a left fingertip on the spot where the quilt top ends underneath the binding and as soon as my thumbnail lines up with marking I stop sewing.
Stop sewing 1/4" from the edge of the quilt
Backstitch to reinforce the seam then cut the threads.
Fold the binding up away from the quilt. The right edge of the binding should line up exactly with the right edge of the quilt.
Fold the binding back down so that the folded edge lines up perfectly with the top edge of the quilt.
Bring the folded end under the needle of your machine. Start sewing again 1/4" away from the top edge. Reinforce the seam.
For reference, your corners should look like this when you're done:
right side
left side
center view
Continue sewing the binding on and repeat the miter method on the other three corners.
Stop sewing about 8-10" away from the spot where you started sewing the
binding down to the quilt. Reinforce your stitches then cut the threads.
Leave a nice long tail of about 8-10" of binding.
Joining the Binding
The instructions below are what I consider to be the easiest way to join the binding ends. It's not the best, though, because it leaves a bumpy spot at the seam. It's best to join the ends on the diagonal like you did the other strips. There's a link to a YouTube video on this method at the end of this tutorial so don't feel obligated to use
my method.
Somewhere near the middle of the open space between the two binding ends, butt the binding strips up against each other so that one end is flat and the other end is folded over.
Measure 1/4" from the fold.
Make a straight cut across at 1/4" from the fold (or slightly more, like 3/8"). You might expect to cut it 1/2" from the cut, leaving you with 1/4" seam allowance at both ends, but I find that the binding stretches out a bit as you sew this bit down, leaving you with some bunching at the end of the open section. Making the binding length a little shorter than the opening on the quilt remedies this problem.
Open up the pressed binding on each end. Line them up, right sides facing, and pin.
Sew a 1/4" seam across. You'll have to bend and maneuver the quilt a bit to get the binding under the sewing machine's needle.
Finger press the seam open.
With the seam open, fold the binding back in half. Line it up with the edge of the quilt. Sew the remaining stretch down using a 1/4" seam. Remember to reinforce the stitches at each end.
Check it out!
This is a good stopping point. In the last post of the series I'll cover hand sewing the binding to the back of the quilt.
Here's the Youtube video I promised earlier. I really like this method and plan to use it on my next quilt:
Thanks for sewing along with me. I'd love to hear your comments/questions if you have any.
Ready to piece piece your quilt top? Let's get to it!
We left off with a stack of 9 four square blocks.
Before we start sewing, I just need to warn you that some of my
methods are unconventional. If you are a seasoned quilter and don't
agree with my techniques, please use your own wisdom. There are three
things in particular I would like to point out that may seem odd:
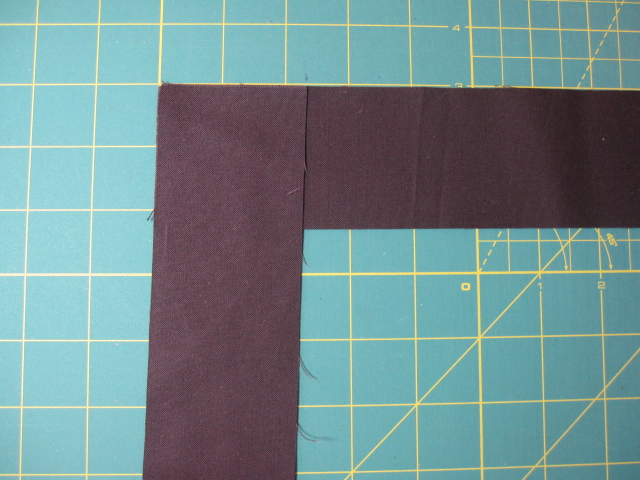
I like to leave the selvedges on my sashing and border strips.
Why, you ask? Because they make it easy to determine the right and wrong
side of the fabric - no easy feat with dark solids. If the little hole are
smooth, you're on the right side of the fabric. If they stick out a bit,
you're on the wrong side of the fabric. As you line up your sashing to
start sewing, make sure you start your sewing past the selvedge. Those
little holes don't usually disappear upon washing :(
I'm the world's laziest pinner. I prefer to press seams flat with
my finger tips as I feed the fabric under the needle. I urge you to take
the time to pin your seams if you're not comfortable with this method.
Finally, are you wondering why I tell you to press your seams
before trimming off any excess sashing or border fabric? I've found
through trial and error that even when I take extra care and caution
when trimming extra fabric before I've pressed, I rarely get a
square/even cut. Try it out yourself and see what you find.
Okay, let's jump right in. Our first step is to square up our blocks. Squaring up your blocks is exactly what it sounds like - measuring blocks and trimming them accordingly to make them both perfectly square and all the same size. I must admit that this is my very least favorite part of quilting and so I'm going to link you up to another tutorial. Your blocks should be somewhere in the 9.5" square range. Mine are about 1/8" under that measurement.
Dreaded squaring up. Maybe you love it?
Once your blocks are all square, lay them out on a design wall or on the floor in their original order (this is when that photo you took comes in handy - again!).
All the blocks in order
Have your sewing machine threaded and ready to sew 1/4" seams.
Grab the 2 1/2" x WOF sashing strip. Now grab the left and center blocks from the first two rows.
Four blocks off to get sashed
We're going to sew the sashing to the right side of each of these blocks, one after the next. I put the sashing right side down, facing the blocks and sew a 1/4" seam along the right edge, avoiding the selvedge.
Mind the selvedge
Now technically you should pin the seam in the center of the block, but I just use my fingers to hold the seam flat as I feed it under the needle and take my time sewing. If you don't feel comfortable with this method then by all means pin.
Pressing the center seam flat while sewing - the lazy girl way!
As you reach the end of the block continue sewing about 1/2" and then line up the next block. Continue in this manner until all four blocks are stitched to the long sashing strip.
Notice the gap between the blocks
Find your two 2 1/2' x 10" strips. Sew these to the right sides of the bottom row's left and center blocks, leaving you with the right column of three blocks with no sashing. Watch the selvedges.
Head over to your ironing board. Set the seams, then press all seams open - even the four blocks sewn to the long strip.
Using your acrylic ruler, line trim off the excess sashing on both sides of all six blocks.
Put your blocks back in order. Now we're going to sew the rows together. Working from left to right, pin the left side of the center block to the right side of the left block (right sides facing). Do this for all three rows.
Center block is on the top facing the left most block. Sew seam on the right side
Chain stitch the three seams. Snip threads.
Repeat with the center block and the right blocks. Pin, chain piece, snip. Press the sashing seams, setting first then pressing them open.
Rows!
Hooray! The rows are done. Now we'll join the three rows together with the remaining two 2 1/2" sashing strips.
Sew a sashing strip to the top and the bottom of the center row.
One side sewn, one to go
Press seams open.
Pin the top row to the top of the sashed center row. Double check that the shashing between the blocks lines up.
Pin the bottom row to the bottom of the sashed center row, again making sure that the vertical sashing strips all line up.
Why yes, those are pins!
Sew a 1/4" seam down one edge, then flip the piece over and sew down the other edge.
Set seams with your iron and then press them open. It's starting to look like a quilt, don't you think? Hang in there because we only have four more seams to go.
Once all seams are pressed, use your clear ruler to cut off the excess sashing along the left and right sides of the quilt top.
Aack! Where did the sun go? Sorry for the blurry pic.
Find your four 5" wide border pieces. Right sides facing, stitch one border piece to the right side of the quilt top, then sew a border strip to the left side. Mind the selvedges again.
Stitching the right border strip
Press open, then trim excess border fabric from each end.
Repeat the steps above with the border strips on the top and bottom of the quilt top. Press and trim.
Phew! We did it! The top is done. Come back for the next installment where we'll start machine quilting.
Thanks for following along. Please leave a comment if you have any questions.