
An Arts & Crafts-inspired, fat quarter-friendly quilt pattern featuring Cindy Lindgren's Amelia Harper fabric collection from Modern Yardage.
Finished size: 35" square

Learn more about the Amelia Harper fabric collection and this quilt pattern here.
About this
Pattern
For
fabrics at least 43” wide. All seams are 1/4”. Always sew fabrics right sides together. Refer to diagrams when cutting and piecing. Mark pieces to simplify construction. Pressing all seams away from solid sashing is recommended, or use preferred pressing method. For best results when piecing, use the solid sashing selvage as a seam leader. Remove the selvage with a ruler and rotary cutter after pressing.
Fabric
Requirements
One
fat quarter (18” x approximately 22”) of each of the following Amelia Harper prints in Monarch by Cindy Lindgren for Modern Yardage:
Print
A – Lambzies in Orange, Large
Print
B – Flower in Mix, Large
Print
C – Dragonflies in Yellow, Large
Print
D – Butterflies in Taupe, Large
Print
E – Boxes in Cocoa, Medium
Print
F – Stripes in Orange, Medium
Print
G – Boxes in Orange, Medium
Plus:
Sashing
– ¼ yard Parchment Robert Kaufman Kona® Cotton
Binding
– ½ yard Amelia Harper Boxes in Turquoise, Small
Backing
– 1 ¼ yards Amelia Harper Dragonflies in White, Large
Cutting
All
measurements are length by width.
From
A, cut 1 rectangle 14 ½” by 15 ½”
From
B, cut 1 rectangle 14 ½” x 10 ½”
From
C, cut 1 rectangle 10 ½” x 15 ½”
From
D, cut 1 square 10 ½” x 10 ½”
From
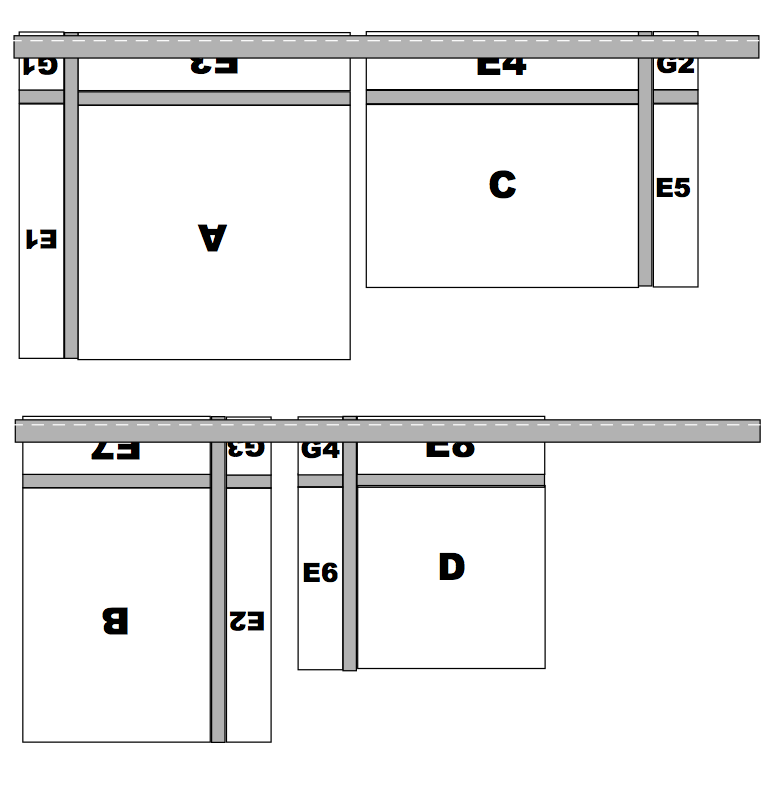
E, cut 2 rectangles 14 ½” x 2 ½” (E1, E2),
cut 2 rectangles 3 ½” x 15 ½” (E3, E4),
cut 2 rectangles 10 ½” x 2 ½” (E5, E6),
cut 2 rectangles 3 ½” x 10 ½” (E7, E8)

From F, cut 1 rectangle 18 ¼” x 3 ½” (F1)*
From F, cut 1 rectangle 18 ¼” x 3 ½” (F1)*
cut 1 rectangle 2 ½” x 18 ¼” (F2)
cut 1 rectangle 14 ¼” x 3 ½” (F3)
cut 1 rectangle 2 ½” x 13 ¼” (F4)
*Piece F1 is slightly longer than a traditional 18" fat quarter. Modify pattern as necessary if fat quarter F is not sufficiently long enough.

From G, cut 4 rectangles 3 ½” x 2 ½” (G1-4)
*Piece F1 is slightly longer than a traditional 18" fat quarter. Modify pattern as necessary if fat quarter F is not sufficiently long enough.
From G, cut 4 rectangles 3 ½” x 2 ½” (G1-4)
cut 1 rectangle 2 ½” x 3 ½” (G5)
From
solid fabric, cut 7 - 1 ¼” width of fabric (WOF) strips. Do not remove selvages.
From
binding fabric, cut 4 – 2 ½” (or preferred binding size) by WOF
strips or cut approximately 4½ yards bias binding.
Quilt
Assembly
Refer to this diagram while piecing.
Block Sets A Through D
 |
| Measurements include seam allowances |
Block Sets A Through D
1. Chain stitch the bottom edge of block A, the bottom edge of block B, and the top
edge of block C to a 1 ¼” x WOF solid sashing strip. Use the selvage as a seam leader and leave approximately ½”
between blocks.

2. Snip sashing between blocks, leaving about a 1/4" tail of sashing on each side of each block.
3. Cut an 11" length from one of the 1 ¼” x WOF strips. Set the remaining length aside.
4. Sew the top edge of block D to the 1 ¼” x 11" solid sashing strip.
4. Sew the top edge of block D to the 1 ¼” x 11" solid sashing strip.
5. Press all four seams.
6. Use a rotary cutter and ruler to trim away extra length of solid sashing.
6. Use a rotary cutter and ruler to trim away extra length of solid sashing.
7. Stitch:
E3 to the sashed edge of block A.
E4 to the sashed edge of block C.
E7 to the sashed edge of block B.
E8 to the sashed edge of block D.Be mindful of orientation if the E print is directional.

8. Press seams.
9. Chain
stitch the leftover piece (from block D) of 1 ¼” sashing to the right side of block set A and block set C.
10. Chain stitch the left side of block set B and the left side of block set D to a 1 ¼” x WOF strip. Leave about ½” between the block sets.

10. Chain stitch the left side of block set B and the left side of block set D to a 1 ¼” x WOF strip. Leave about ½” between the block sets.
11. Snip block sets apart. Cut away excess lengths of narrow sashing and reserve.
12. Press seams of all four block sets. Remove narrow sashing tails with a rotary cutter and ruler.
12. Press seams of all four block sets. Remove narrow sashing tails with a rotary cutter and ruler.
14. Press all seams.
15. Square up the sashing with a ruler and rotary cutter.
16. Sew the sashed edge of E1 to the lower edge of G1, and E2 to G3. Sew the sashed edge of G2 to the top edge of E5, and G4 to E6.

18. Match up the right edge of block set A to block set E1, using care to line up the horizontal solid sashing. Pin. Repeat with block set C to block set E5.
Match up the left edge of block set B to block set E2 and pin. Do the same with block set D to block set E6. Take care to line up horizontal solid sashing.

19. Stitch seams.
20. Press.
21. Chain stitch a 1 ¼” x WOF solid sashing strip to the bottom of block set A, the top of block set C.
Chain stitch a 1 ¼” x WOF solid sashing strip to the bottom of block set B, and the top of block set D.
23. Sew block set A to F2 along the solid sashed edge. Repeat with block set B and F4.
24. Press seams.
25. Match up F2 to block set C, taking care that the vertical solid sashing is aligned, and pin. Sew block set C to F2. Repeat with F4 to block set D.
26. Press seams.

Center Column
27. Trim
the remaining two solid sashing WOF strips to 36” and set aside. Cut
one of the leftover pieces in half. The two pieces of solid sashing should be at least 3 ½” long.
28. Sew the strips to the top and bottom edges of G5. Press seams.
28. Sew the strips to the top and bottom edges of G5. Press seams.
29. Sew F1 to the top sashed edge of G5 and F3 to the bottom sashed edge of G5.

30. Press seams.
31. Sew
the 1 ¼” x 36” narrow sashing strips to the left and right sides
of the long piece.

32. Press seams.
33.Trim away any extra length of solid sashing.
Join
Sections
34. Line
up the center column with the left side of the B/D block set.
Carefully match the G5 rectangle with piece F4 so that the solid
sashing strips line up. Pin and sew.
35. Press seam.
36. Line up the center column to the right side of the A/C block set, using care to match up the G5 rectangle with piece F2. The horizontal solid sashing strips should line up. Pin and sew.
37. Press seam.

35. Press seam.
36. Line up the center column to the right side of the A/C block set, using care to match up the G5 rectangle with piece F2. The horizontal solid sashing strips should line up. Pin and sew.
37. Press seam.
Finishing
38. Make a quilt back 43" long by 43" wide. Layer batting between the quilt top and backing. Baste the quilt sandwich.
39. Quilt as desired.
40. Bind the quilt with either 4 WOF fabric strips stitched end to end or approximately 4 ¼ yards of finished bias binding.
.jpg)
Craftsman Baby Quilt © 2014 Jennifer Annik Miller
Nice one!
ReplyDeleteOoh, this is a fab little baby quilt! I love that it uses big pieces but doesn't look too simple! :)
ReplyDelete