Minnesota has been far more September than July lately. Fine by me. July is usually much too hot for sewing since my little studio doesn't have air conditioning. The very thought of turning on the iron typically sends sweat down my spine. But this is sewing weather!
I've spent every spare moment of the last week machine quilting the large version of my Bella Roma quilt.
Inspired by Angela Walters' Free-Motion Quilting book (a must-have for any quilter), I opted for an all over faux bois/woodgrain pattern.
At 81" by 102", this is the largest quilt I've ever made and the free motion design is taking me FOREVER. I'm not even at the half way point yet. It's a 10 bobbin quilt at least and it looks like a single 1300 meter spool of Aurifil won't be sufficient. Eek!
All whining aside, it feels great to be sewing.
The Monster
I'll share a photo of the finished product when I'm done. Oh, please let that be soon...
Hi. Sorry about the long silence. What can I say? I had a great summer with my three kiddos, including lots of new experiences and adventures. The old blog was kinda the last thing on my mind. Thanks for sticking with me these past few months. I promise to make it up to everybody with a giveaway, so stay tuned.
Blogging wasn't the only thing I didn't do this summer. I hardly touched a sewing machine. But the weather is getting cooler now, the leaves are turning red (okay, mostly dry/dead brown), which can only mean one thing: it's sewing season!! And what better way to get back into the swing of things than to take a class with Jacquie Gering of Tallgrass Prairie Studio fame?
Jacquie and my dear friend Rebecca hamming it up for the camera.
This past Saturday the Minneapolis Modern Quilt Guild brought Jacquie to town to teach us how to machine piece hexagons - a dry run for her sold-out Quiltcon class in February. Jacquie is warm, kind, encouraging, thoughtful, concise, and so talented! You lucky Quiltcon ducks are going to love her class!
The Hexie Class of 2012 at Sewtropolis. Our esteemed teacher is way in the back. How did that happen??
Some people in the class did a ton of sewing. Me? Not so much. Those are my hexies up on the design wall - that was as far as I got. Next time, more sewing and less chatting.
Even if you don't have the opportunity to take a class from Jacquie, do check out her amazing book called Quilting Modern. The photos alone will provide endless inspiration.
Okay, I've got lots of things to show and tell you but you'll have to wait until tomorrow...
Happy sewing,
-Annik
P.S. Serious props to Flaun for making this weekend happen :)
Woohoo! We're almost done with our Four's a Charm baby quilt! In this installment we're going to cover making binding and sewing it on to the quilt. Hand sewing the binding will be the last installment (coming soon).
Our first task is to trim off the excess batting and backing around the quilt top. Use a rotary cutter and long ruler, as I'm doing here in this photo, or trim down the quilt the old fashioned way with a pair of scissors.
Once you've trimmed the quilt on all four sides, it should look like this:
Cutting and Joining the Binding Strips
Time to make our binding (yardage is listed in the first post of this series).
You have two options when it comes to cutting binding strips. The first option is to cut your binding strips along the width of the fabric (WOF). This is very simple and fast and is the method I typically use. The second method is to cut your binding along the bias. I opted to cut my binding on the bias because I love the way it looks with the stripey scarf print from the Sherbet Pips collection. If you're interested in this method, here's a link to my continuous bias tutorial. If not, read on.
For the WOF strip method, the first thing you need to do is determine the number of strips to cut. Our trimmed quilt is 40" square. 40" x 4 sides = 160" plus we need extra length for seam allowance and for making our mitered corners. Measure the width of your binding fabric, not including the selvedges. If it's less than 43", you'll need to cut 5 WOF strips (or 4 and 1/2). If it's more than 43" wide you can get away with only 4 strips.
To make WOF binding, use your rotary blade a long ruler to cut four or five WOF x 2.5" strips. I personally prefer to cut my binding strips to 2.25", but if you've never bound a quilt before I suggest you use the wider measurement.
Cut the selvedges off of both ends of all of the binding strips.
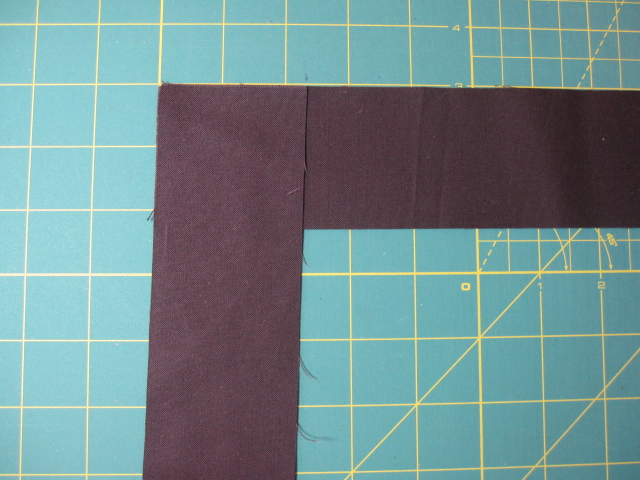
Place one strip right side up in a horizontal position.
This is some espresso brown binding I've already cut for another quilt. I won't be using this on my Four's a Charm quilt!
Place another strip face down (right sides facing) in the vertical position so that the corners match up.
Use your ruler and a pencil to mark a diagonal line from the bottom left to the top right of the overlapping fabric.
Place a pin on each side of the mark, leaving enough room to sew your seam.
Sew along the marked line.
Repeat these steps until all the binding strips are joined together.
Use your ruler and rotary cutter to trim away all but 1/4" from each seam.
Press the seams open.
Finally, press the binding in half lengthwise, wrong sides facing.
Attaching the Binding
Now it's time to attach the binding to the quilt. Thread your machine with thread that matches the binding or something neutral. I'm using the same gray I used to do the free motion quilting. Attach your 1/4" piecing foot if you have one, otherwise, use the 1/4" measurement on your foot plate as your guide.
Tip: I simply love my "O" foot for my Janome. It's a 1/4" piecing foot and it has little markings at 1/4" before and after the needle. These markings are extremely helpful when sewing on binding as you'll see shortly. Don't have the same markings on your foot? You might want to consider marking these measurements with a Sharpie marker, or simply keep a ruler handy.
Starting at approximately the center of the bottom edge of the quilt, line up the raw edges of the binding against the right side of the quilt. Leave a tail of about 6-8" then start sewing on the binding using a 1/4" seam allowance. Reinforce your stitches when you start so they don't rip out as you're maneuvering around the quilt.
Leave a tail
Sewing on the binding
I use my right hand to guide the binding strip and my left hand to hold it all in place (gently!) so I don't have to pin anything.
Mitering the Corners
Stop sewing when you you're 1/4" from the edge of the quilt top edge. This is where I used the marking on my foot for a reference. I place a left fingertip on the spot where the quilt top ends underneath the binding and as soon as my thumbnail lines up with marking I stop sewing.
Stop sewing 1/4" from the edge of the quilt
Backstitch to reinforce the seam then cut the threads.
Fold the binding up away from the quilt. The right edge of the binding should line up exactly with the right edge of the quilt.
Fold the binding back down so that the folded edge lines up perfectly with the top edge of the quilt.
Bring the folded end under the needle of your machine. Start sewing again 1/4" away from the top edge. Reinforce the seam.
For reference, your corners should look like this when you're done:
right side
left side
center view
Continue sewing the binding on and repeat the miter method on the other three corners.
Stop sewing about 8-10" away from the spot where you started sewing the
binding down to the quilt. Reinforce your stitches then cut the threads.
Leave a nice long tail of about 8-10" of binding.
Joining the Binding
The instructions below are what I consider to be the easiest way to join the binding ends. It's not the best, though, because it leaves a bumpy spot at the seam. It's best to join the ends on the diagonal like you did the other strips. There's a link to a YouTube video on this method at the end of this tutorial so don't feel obligated to use
my method.
Somewhere near the middle of the open space between the two binding ends, butt the binding strips up against each other so that one end is flat and the other end is folded over.
Measure 1/4" from the fold.
Make a straight cut across at 1/4" from the fold (or slightly more, like 3/8"). You might expect to cut it 1/2" from the cut, leaving you with 1/4" seam allowance at both ends, but I find that the binding stretches out a bit as you sew this bit down, leaving you with some bunching at the end of the open section. Making the binding length a little shorter than the opening on the quilt remedies this problem.
Open up the pressed binding on each end. Line them up, right sides facing, and pin.
Sew a 1/4" seam across. You'll have to bend and maneuver the quilt a bit to get the binding under the sewing machine's needle.
Finger press the seam open.
With the seam open, fold the binding back in half. Line it up with the edge of the quilt. Sew the remaining stretch down using a 1/4" seam. Remember to reinforce the stitches at each end.
Check it out!
This is a good stopping point. In the last post of the series I'll cover hand sewing the binding to the back of the quilt.
Here's the Youtube video I promised earlier. I really like this method and plan to use it on my next quilt:
Thanks for sewing along with me. I'd love to hear your comments/questions if you have any.
Ready for the next installment of Four's a Charm? It's time to free motion quilt our sandwich!
Let's start with some basics for those of you who have never free motion quilted before, like what the heck is free motion quilting? It's free because the feed dogs on your machine are lowered, meaning the sewing machine isn't controlling the movement of the fabric. This puts you in charge of moving the quilt sandwich around to get your desired design, hence the motion.
Free motion quilting is a bit intimidating, so if you've never done it before consider practicing on a couple of test sandwiches.
Another good idea is to check out online classes or videos. I picked up an excellent book at the library recently called Free-Motion Machine Quilting by Don Linn. This book contains tons of good advice and is definitely worth reading.
Feeling confident? Great. Let's get our supplies together. Here's what we'll need:
a darning foot
quilting gloves
an extension table (maybe not required but extremely helpful)
cotton thread. I'm using Aurifil Cotton Mako 40 weight thread in gray #2605 - but Gutermann works great, too, and is easier to find
a few filled bobbins. Free motion quilting uses lots of thread, so be ready!
pillows or blankets or towels to sit if you don't have an adjustable height office chair
a fresh sewing needle, ideally size 14 topstitch needles, but just about any universal needle will work if it's new and sharp
Start by lowering the feed dogs on your machine. Those are the little teeth on the foot plate that move the fabric under the needle.
Set your stitch length to 0.
We're going to start sewing at the center of the quilt and work in quadrants. Here's a diagram of the basic meander stitch I'm using and the path I'm taking starting at the center:
Notice how I change direction in quadrant 4. If quilting starts to feel awkward and you're having difficulty managing the sandwich, it's probably time for change in direction. While the switch direction is obvious in my diagram, it won't be noticeable at all on the finished quilt.
One last thing before we begin. It's okay to free motion in and out of the edges of the quilt even though that's not obvious from my drawing.
Not only is it okay to stitch beyond the top, it's encouraged!
Roll up two sides of the sandwich then slide the under the needle until you get to the center of the quilt.
Holding the tail of the needle thread, bring the needle down into the sandwich and then back up again just one time. Pull on the tail until the bobbin thread comes up through the sandwich. Use the tip of your scissors or a pair of tweezers to pull the bobbin thread completely out.
Move the threads out of the way the best you can then make 3 or 4 stitches in the same spot where you pulled out the bobbin thread to anchor your stitches.
Place your gloved hands on either side of the needle and gently start moving the sandwich while you sew, creating your desired pattern. If your machine has a speed control function, use it. Start on the slow speed and work your way up to medium as your skill increases. It's easy to feel out of control when you're sewing too fast. Speed control really helps mitigate this problem.
The trick to free motion quilting is finding just the right sewing speed and just the right speed with your hands. When these two forces are out of whack, stitches can be either too long or too short. Long stitches mean you're moving too fast compared to the speed of the needle. Super short stitches are caused by the opposite - moving too slowly while the needle is moving too fast.
Remove your pins as you go, stopping often. If you can program your machine to stop in the needle down position this makes stopping and starting again much easier. Needle up/needle down is definitely a luxury of newer machines. If you don't have it, turn the hand wheel until your needle is planted into the sandwich whenever you stop.
Plan ahead so you don't get trapped in a corner.
Once the top is completely quilted, bury the threads in the sandwich. Here's a cool technique I found on YouTube:
Here are a few free motion tips worth mentioning:
Sit up high. Your elbows should ideally be at 45 degree angle to your body.
Good lighting is a must
Take plenty of breaks
Take off your shoes. You'll have greater control in bare or stocking feet.
Keep your shoulders relaxed
Don't sweat the mistakes. Once the quilt is washed all those little imperfections will magically disappear.
Yippee! We're almost done with our Four's a Charm quilt. In the next (and last) installment we'll cover how to bind the quilt.
'Tis the season for making resolutions.I thought I would share a few of mine. I hope you'll do the same in the comments. If you've already blogged about your resolutions, please share your blog link in the comments.
Here's my list -
Make more clothes for the kids (especially from that enormous stack of Ottobre Design magazines).
Make slopers for myself. I'm ready for my homemade/handmade clothes to fit me right the first time.
Put a dent into the stash. It's time to use it up (so I can buy more, of course!).