Showing posts with label Sherbet Pips. Show all posts

Monday, February 13, 2012

Four's a Charm - Let's put the quilt top together

Ready to piece piece your quilt top? Let's get to it!

We left off with a stack of 9 four square blocks.


Before we start sewing, I just need to warn you that some of my methods are unconventional. If you are a seasoned quilter and don't agree with my techniques, please use your own wisdom. There are three things in particular I would like to point out that may seem odd:
  1. I like to leave the selvedges on my sashing and border strips. Why, you ask? Because they make it easy to determine the right and wrong side of the fabric - no easy feat with dark solids. If the little hole are smooth, you're on the right side of the fabric. If they stick out a bit, you're on the wrong side of the fabric. As you line up your sashing to start sewing, make sure you start your sewing past the selvedge. Those little holes don't usually disappear upon washing :(
  2. I'm the world's laziest pinner. I prefer to press seams flat with my finger tips as I feed the fabric under the needle. I urge you to take the time to pin your seams if you're not comfortable with this method.
  3. Finally, are you wondering why I tell you to press your seams before trimming off any excess sashing or border fabric? I've found through trial and error that even when I take extra care and caution when trimming extra fabric before I've pressed, I rarely get a square/even cut. Try it out yourself and see what you find.
Okay, let's jump right in. Our first step is to square up our blocks. Squaring up your blocks is exactly what it sounds like - measuring blocks and trimming them accordingly to make them both perfectly square and all the same size.  I must admit that this is my very least favorite part of quilting and so I'm going to link you up to another tutorial. Your blocks should be somewhere in the 9.5" square range. Mine are about 1/8" under that measurement.

Dreaded squaring up. Maybe you love it?
Once your blocks are all square, lay them out on a design wall or on the floor in their original order (this is when that photo you took comes in handy - again!).

All the blocks in order
 Have your sewing machine threaded and ready to sew 1/4" seams.
Grab the 2 1/2" x WOF sashing strip. Now grab the left and center blocks from the first two rows.

Four blocks off to get sashed
We're going to sew the sashing to the right side of each of these blocks, one after the next. I put the sashing right side down, facing the blocks and sew a 1/4" seam along the right edge, avoiding the selvedge.
Mind the selvedge
 Now technically you should pin the seam in the center of the block, but I just use my fingers to hold the seam flat as I feed it under the needle and take my time sewing. If you don't feel comfortable with this method then by all means pin.

Pressing the center seam flat while sewing - the lazy girl way!
As you reach the end of the block continue sewing about 1/2" and then line up the next block. Continue in this manner until all four blocks are stitched to the long sashing strip.

Notice the gap between the blocks
Find your two 2 1/2' x 10" strips. Sew these to the right sides of the bottom row's left and center blocks, leaving you with the right column of three blocks with no sashing. Watch the selvedges.


Head over to your ironing board. Set the seams, then press all seams open - even the four blocks sewn to the long strip.

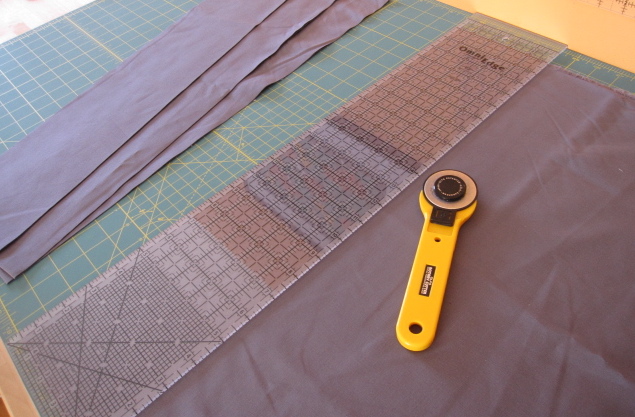
Using your acrylic ruler, line trim off the excess sashing on both sides of all six blocks.


Put your blocks back in order. Now we're going to sew the rows together. Working from left to right, pin the left side of the center block to the right side of the left block (right sides facing). Do this for all three rows.

Center block is on the top facing the left most block. Sew seam on the right side
Chain stitch the three seams. Snip threads.

Repeat with the center block and the right blocks. Pin, chain piece, snip. Press the sashing seams, setting first then pressing them open.

Rows!

Hooray! The rows are done. Now we'll join the three rows together with the remaining two 2 1/2" sashing strips.

Sew a sashing strip to the top and the bottom of the center row.

One side sewn, one to go
Press seams open.


Pin the top row to the top of the sashed center row. Double check that the shashing between the blocks lines up.


Pin the bottom row to the bottom of the sashed center row, again making sure that the vertical sashing strips all line up.

Why yes, those are pins!
Sew a 1/4" seam down one edge, then flip the piece over and sew down the other edge.


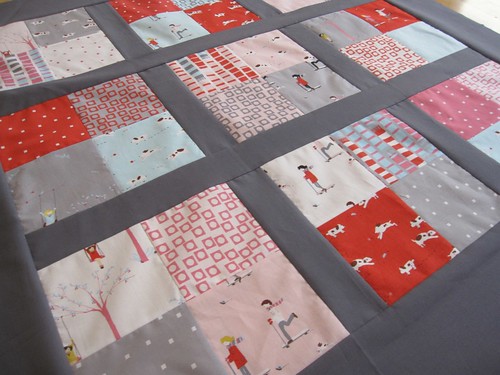
Set seams with your iron and then press them open. It's starting to look like a quilt, don't you think? Hang in there because we only have four more seams to go.

Once all seams are pressed, use your clear ruler to cut off the excess sashing along the left and right sides of the quilt top.

Aack! Where did the sun go? Sorry for the blurry pic.
Find your four 5" wide  border pieces. Right sides facing, stitch one border piece to the right side of the quilt top, then sew a border strip to the left side. Mind the selvedges again.

Stitching the right border strip
Press open, then trim excess border fabric from each end.


Repeat the steps above with the border strips on the top and bottom of the quilt top. Press and trim.

Phew! We did it! The top is done. Come back for the next installment where we'll start machine quilting.

Thanks for following along. Please leave a comment if you have any questions.

-Annik

Related posts:
Fabric Requirements
Cutting
Constructing the Blocks
Link to Four's a Charm Page


Sunday, January 29, 2012

Four's a Charm - Let's start cutting


Have you got your materials together for the Four's a Charm quilt? Great! Let's start cutting!

A quick word about fabric washing before we start. I'm not prewashing any of my fabrics because the charm pack squares can't be prewashed. This is an all or nothing scenario. If you're using scraps that have been prewashed, then please do prewash and press your sashing, backing, and binding fabrics.

Here's the cutting diagram for the sashing/border fabric.

Fold the fabric in half along the length so that the selvedges match up. Make a clean cut along the top edge so that the fabric is perfectly straight (along the grain) using your clear acrylic ruler. Next, cut four 5" long by width of fabric (WOF) strips.

Three 5" x WOF strips cut, one to go.

Now cut three 2.5" by WOF strips. Cut a 10" length from two of the strips - be sure to cut off the selvedge on that end before you make the 10" cut. Now you should have:

1 - 2.5" x WOF strip
2 - 2.5" x approximately 32" to 34" long strips
2 - 2.5" x 10" strips
4 - 5" x WOF strips

Set your sashing and border pieces aside for later.

If you're using a charm pack for the quilt, select the 36 squares/prints you want to use. If you're planning to raid your scraps bin, you'll need to cut 36 - 5" squares so get busy!

In my next post we'll lay out the squares, piece the blocks, and construct the quilt top.

Leave me a comment if you have any questions.

-Annik

Link to Four's a Charm Page

Sunday, January 22, 2012

Four's a Charm Baby Quilt - Fabric Requirements


Looking for a fun and easy baby quilt pattern? Well, look no further. I call this Four's a Charm because it's four patches made from a charm pack. Get it? Of course you do. Moving on...

This project is ideal if you're new to quilting. I'll give step by step instructions as we go. And please feel free to leave questions or comments.

The finished quilt is 40" square.


Fabric requirements:
  • 36 - 5"squares, either from a charm pack or bust some scraps - I'm using Sherbet Pips by Aneela Hoey for Moda
  • 1 yard Kona Cotton in Coal (you really only need 28", but I rounded up a bit) or sashing/border fabric of your choice
  • 1 1/4 yards backing fabric. Measure the backing fabric. It must be a minimum of 42" wide. If it's not at least that wide, be prepared to piece the back.
  • 1/3 yard binding fabric or you can squeeze by with 1/4 yard if you opt for 2 1/4" binding

You'll also need:
  • Crib size quilt batting. I typically buy the organic cotton kind from Poly-fil/Fairfield
  • Cotton thread
  • A rotary cutter, self-healing cutting mat, and a long clear acrylic ruler
  • Pins
  • Basting spray (I like 505 Spray Adhesive best) or quilting safety pins 
  • If machine quilting, you will need either a darning or stippling foot if you're planning to do free motion quilting, or a walking (a.k.a. even feed foot) if you're planning to do straight line quilting. A 1/4" piecing foot really is really helpful, but it's not a requirement.
  • Oh, and a sewing machine and an iron come in handy, too! ;)


 This pattern is really very simple. It's contrast that makes it interesting. Keep this in mind as you select your block and sashing fabrics. Remember that contrast can be achieved either by pairing complementary colors or via value. For more about this see my post called Color Theory 101. And when in doubt, ivory looks good with just about everything.

Get your fabrics together. We'll start cutting shortly.

-Annik

Link to Four's a Charm Page

Tuesday, December 6, 2011

Tell Me Tuesday #3

Yes, I'm still doing Tell Me Tuesday. I refuse to give up! Today's question is an easy one, though, so please leave an answer -


What's your favorite color combination?


Right now I'm loving medium gray + a bright color (see TMT#2). I hope gray isn't passé because I'm not done with it yet. I wonder what the next "it" neutral will be?
Sherbet Pips WIP
Red and turquoise is still hot IMHO

Friendly yellow + stoic gray

Thanks for leaving an answer. I can't wait to hear about your color faves :)

-Annik

Wednesday, September 14, 2011

Another W.I.P. Wednesday

Let's start with a finished product, shall we? It always feels so good to complete a quilt.

An original design featuring "Swanky" prints by Moda. Backing is a Happier print by Riley Blake Designs


I opted to machine bind this quilt. While I prefer the look of a hand bound quilt, sometime you do what you gotta do. Have you ever used Wash Away Wonder Tape double sided adhesive tape? I love the stuff. I stuck my binding in place on the back side of the quilt, then snapped on my handy dandy Janome "S" foot and stitched in the ditch along the binding seam on the top side. It literally took less than five minutes to complete


Here's another WIP I'm working on -


I picked this up panel along with a bundle of coordinating fat quarters at the Robert Kaufman Sample Spree table at Spring 2010 Quilt Market. I added the midnight blue Carolina Chambray border and dotty cornerstones just to give it a little something extra. Sadly, Treadle Yard Goods, informed me that Robert Kaufman has essentially discontinued the vast majority of Carolina Chambray. Stock up if you see any because it's absolutely wonderful.


Now that the quilting is done I hope to get the binding on before the end of the day, children permitting.

Here's my last sneak peek. It's Sherbet Pips!


Please let my package full of backing and binding arrive today. I've been waiting ever so patiently.

Happy sewing,
Annik